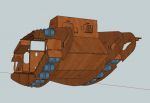
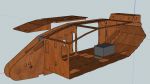
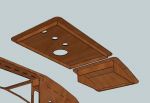
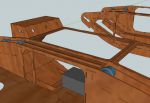
Landships II

Members Login
Username 
 
Password 
    Remember Me  
Post Info TOPIC: 3D Printing a MK1 Tank track link


Legend

Status: Offline
Posts: 1062
Date:
RE: 3D Printing a MK1 Tank track link
Permalink   


Marine-grade ply? Excellent choice. Laser-cutting is obviously a specialist thing, but the accuracy it would give would be fitting, after the efforts you are going to with the plans.

__________________


Hero

Status: Offline
Posts: 808
Date:
Permalink   

I must admit I'm still a little worried about mixing materials... but... the main body is good quality ply and the metal is just a scale cladding... so should be fine.

There are a number of people I can go to for the laser cutting, so with luck that will keep the costs down. My thinking behind a wooden body is one simple construction and if I get the design right, the possiblilty to try out a wood only model to get all the mechanics right. Well that's the plan. confuse

The advantage of laser cutting, is I can get a number done for sale, and me and my tank building group can get some of our money back. 

Helen x


__________________


Legend

Status: Offline
Posts: 1062
Date:
Permalink   

Well, I for one agree with you in thinking plywood a good choice for simpler construction; I considered it myself for use at a smaller scale (1/16) for similar reasons - if I ever get round to making a radio-controlled model.

The thing to remember is that wood can absorb moisture, so whilst the glue bonding the plies of marine ply together will be resistant to moisture, it would need careful thought about which parts may trap moisture during operation or cleaning - and seal these appropriately with a wood sealer or a PVA solution. It may also be necessary to leave small patches unsealed to allow the wood to breathe (let out moisture), but I'm no expert - there may not be any problems with sealing the whole of every wooden surface.

__________________


Hero

Status: Offline
Posts: 808
Date:
Permalink   

Had to chase a few errors around the model which has taken up most of the time spent on it recently... but glad I did. A recent post has highlighted some missing details on the underside, working on that soon.

Many issues yet to be decided upon... 'T' beams on roof, hatches to gain access and several I've just forgotten.... I think it's time for bed.

I will try and get printing parts again soon. This time I will try and remember to time the parts.

Hel x


Attachments
__________________


Legend

Status: Offline
Posts: 1062
Date:
Permalink   

Looks good. Just as a thought, having recently looked at the website for the Poelkapelle replica, have you thought about adding extra rollers across the top of the tank as a practical concession? It wouldn't be accurate, but would stop the tracks scraping over a large portion of their run - reducing wear.

__________________


Hero

Status: Offline
Posts: 808
Date:
Permalink   

TinCanTadpole wrote:

Looks good. Just as a thought, having recently looked at the website for the Poelkapelle replica, have you thought about adding extra rollers across the top of the tank as a practical concession? It wouldn't be accurate, but would stop the tracks scraping over a large portion of their run - reducing wear.


Hiya,

Actually I shouldn't be talking to you as the point you made just made a LOT of work for me. no

Naah you're safe. Your post pointed out to me that I was loosing sight of this as a working model. 

The idea of rollers across the top will help wear and tear on the track and make it easier... ish to move. Also I've thought again about how the rollers are fitted. Now they sit in groups in boxes that bolt up into the horns of the tank. This has also made me rethink the rollers themselves, and now there is 'just' the flanged type and less of them. 

The rollers push up into the boxes and are then held in place by a shaft with a 'D' shape end. The shaft is only shaped at one end, as this both stops it rotating and pushing all the way through. The ends of the shafts are flush with the sides of the roller boxes, this enables them to be trapped in place once pushed up into the horns.

The upper rollers will be done the same way.

A lot more work to be done, but now feeling happier that it will not only work when finished... but also be easier to work on and maintain.

Thanks for the extra pair of eyes and looking over my shoulder... although nice and scale, I think I was going down the wrong route before.

Helen x


-- Edited by MK1 Nut on Wednesday 27th of February 2013 12:58:23 AM

Attachments
__________________


Legend

Status: Offline
Posts: 1062
Date:
Permalink   

MK1 Nut wrote:

Thanks for the extra pair of eyes...


-- Edited by MK1 Nut on Wednesday 27th of February 2013 12:58:23 AM


 Glad you find it helpful.

In case you haven't seen the website for the Poelkapelle replica, here it is - there is a CAD image of the basic structure, which shows the rollers they plan to use over the roof.


__________________


Hero

Status: Offline
Posts: 808
Date:
Permalink   

Wooden frame design now finally looking like something that will work. :)

The grey 'thing' is a 12volt 15amp bettery, just wanted to put something in there for scale.

There's a lot more stiffening frames in there now... realised even at 3mm the  big flat panels will warp without it.

Sponsons next....... shoot me now! no

Hel x


Attachments
__________________
MRG


Major

Status: Offline
Posts: 121
Date:
Permalink   

Hello all,


very interesting thread, especially seeing different solutions to the track guidance - and also to different materials. Great work!!

I envy you for your CAD abilities, I had a go at that recently - as I had all the pistol port lids for the Mark IV lasercut from stainless steel.

Much more convenient than my original plan of jig-sawing them all out by hand   smile  Never thought of 3D-printing, but most of the parts on mine are of metal anyway. Great new possibilities! I had to make my track tensioner blocks by hand...

MarkIVtensioners01.jpg


MarkIVtensioners04.jpg

 At that point of time they were not quite finished yet, still needed the corners rounded and such...

Best regards,


Martin


-- Edited by MRG on Wednesday 6th of March 2013 11:05:25 PM

__________________


Sergeant

Status: Offline
Posts: 44
Date:
Permalink   

Martin, As a long time metal worker I must complement you on your work, I know what it takes to do this kind of work. WELL DONE.


Jim


-- Edited by cpljimmy on Thursday 7th of March 2013 05:28:41 PM

__________________

the large print giveth, the small print taketh away Tom Waits


www.flickr.com/photos/closing_rivets_up


Hero

Status: Offline
Posts: 808
Date:
Permalink   

Hi Martin, glad you're enjoying the discussion on build techniques. I will say though that I would love your metal working skills over my CAD ones. You're doing a really nice job with your MKIV build.

I said a few years back that I would 'never' be able to get the hang of 3D CAD work... ok so I'm still not fantastic at it, but about six months of trial and a LOT of error, and I'm able to design stuff I would never have dreamed of.

My plan is to have the metal skin laser cut, what were the results like with the stainless steel pistol ports?

Helen x


__________________
MRG


Major

Status: Offline
Posts: 121
Date:
Permalink   

Thank you!! I enjoy working with metal very much, brass being my favourite material.


The pistol port lids came out nicely, just a small projection on the edge, at the moment where the laser cut through the last bit of material. That being 0,8 mm stainless steel, price was very reasonable at 24 Euro cents per lid. I had 120 lids done in one batch.

No comparison to the time, broken sawblades and drills I would have needed - and much more precise than I could ever have done by hand.

I did this over an online lasercut service - you upload your vector file, chose the material and get the price immediately. Only then do you place the order. I can give you the address by PM if you are interested.


With best regards,


Martin


__________________


Hero

Status: Offline
Posts: 808
Date:
Permalink   

Ummm not sure what vector files are but I'm sure I will find out. Well I did say I was still learning. :)

Thanks for the information, if you could message me the details of the firm that helped you, it would help me get a clearer idea of costs.

Helen x


__________________


Legend

Status: Offline
Posts: 1062
Date:
Permalink   

Helen, I imagine a vector file means a CAD drawing done with vector graphics - ie all lines have a magnitude and direction, rather than a certain number of pixels, so zooming in does not alter the sharpness or accuracy as it does with pixel-based drawing. The files for your Mk 1 drawings should be suitable.

Martin: lovely work on your Mk IV model. I was wondering what the triangular plate at the top right of the track horn photo is?

__________________
MRG


Major

Status: Offline
Posts: 121
Date:
Permalink   

Hi Helen, hi TCT,

yes, thats what I meant with vector file (being .dxf format in this case) as all CAD drawings are vector-based, enabling you to rescale the drawings at will without loss of precision.

The triangular reinforcement plates sit at the sides left and right of the upper front glacis plate. You can see these on the frontal views of the Mark IV (check out Landships II site, "Surviving Mark IV", Liberty (APG) picture no. 20 for example),  the only tank I have seen with these missing is Flirt - which is probably a result of its restoration. The two empty holes hold the bespoken headlamp brackets.


With best regards,


Martin


__________________
«First  <  1 2 | Page of 2  sorted by
 
Quick Reply

Please log in to post quick replies.

Tweet this page Post to Digg Post to Del.icio.us


Create your own FREE Forum
Report Abuse
Powered by ActiveBoard