Thanks PDA! Yesterday when I posted the pics it was late and I didn't felt like putting comments to the pictures. But if you gentlemen (and Lady, as at least I know that Mk1Nut might probably read this post as well) can bear with the explanation, I'll add some thing here.
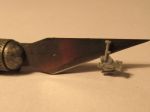
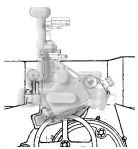
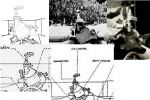
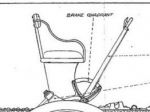
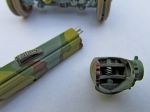
The first picture shows the cannon sight assembly from the kit (two tiny separate parts with little, although discernible, flash). I attach here the drawings from the cannon's user manual, plus an approximate ghost image of the same piece superimposed to it. It doesn't match too well, and given the general high accuracy of the kit, I suspect that this could be other type of gunsight than the one depicted in the plastic part.
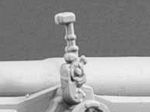
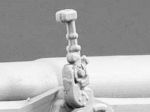
Regarding the sight... the kit assembly seems to be the sight support (fixed on the left trunnion of the cradle), sight (for elevation) and goniometer (to determine direction). The sight column support is the vertical limb, and the collimator the small horizontal portion on top of all. The blobs and bits molded in are -purportedly?- control knobs and sight levels.
I guess that the whole apparatus must have been made of brass or steel, and the knobs and controls might have been of nickel, the level tubes with crystal, etc.
I'm a bit at odds on how to paint this thing. It never shows too well in period pictures, and given the fact that the thing looks vaguely expensive, it sometimes appear under a canvas or leather cover, appearing as a undetermined mass.
I'm posing the model as "in transit". Should this thing appear covered in this configuration? If covered, might the vertical column with the collimator and goniometer be removed during transit? This might determine the shape of the final thing on the model...
Please share your thoughts! My knowledge of artillery technology is very limited!
And interestingly enough, the kit brings an optional part to replace this sight assembly. In fact, this optional part is shown on the built model that appears on the web as a promotional piece. Maybe this might be an American or German post-war model?
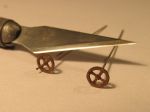
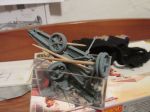
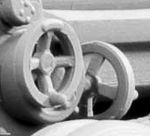
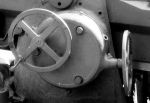
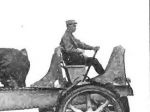
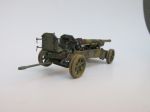
The second image, are the handwheels to adjust direction and elevation of the barrel
The kit parts are well designed and in scale, except on thickness. I sanded them almost to destruction... I drilled the centre hole and added a wire shaft (the plastic axle on the cradle is short and somewhat fragile) and changed the handles of each wheel because the original parts had a thicker handle of different shape. I attached here a photo of the original kit parts, without modification. Alos attached, is a photo of the real thing.
-- Edited by d_fernetti on Tuesday 22nd of July 2014 06:23:40 PM
Thanks! The handles were pretty simple: cut the plastic stubs level to the wheel rim. Then drill on the centre of the round "scar" left, with the smallest drill bit you have. Put an oversized lenght of wire in the hole, just after dipping the end on a drop of superglue. Once this is set (some seconds), trim the wire to the correct lenght to form the handle. I brush painted these wheels with enamel. As the last touch, I dropped on the handle end a tiny amount of enamel without thinning it, straight form the tinlet. After it dried, it formed a small blob that gave it the rounded shape you see. BTW just after seeing the digital photos I was able to see the exact shape, same as some of the residual flash left around the sight parts. It's quite difficult to see to my slightly myopic eyes!
-- Edited by d_fernetti on Tuesday 22nd of July 2014 09:52:20 PM
-- Edited by d_fernetti on Tuesday 22nd of July 2014 09:52:35 PM
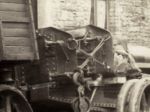
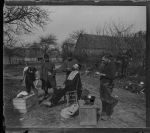
Again, it's just a simple copper wire loop inserted in a tiny hole. The detail is absent, yet it can be easy seen on most of the pictures and has to be there in case you want to install the road brake cart in the rear. Here's a couple of period pictures showing the detail:
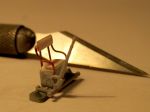
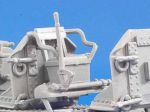
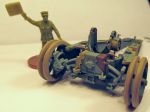
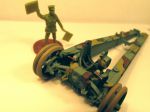
My favourite piece of the kit (do you gentlemen have favourite pieces in kits? Is it just me? Am I losing my mind?) was the brakeman seat. It's a sort of park bench with a brake lever in the unfortunate position of being between the cannon and the tractor. At 13000 Kg. the cannon must have been quite a handful to control in a potholed road. Here's my version of it.
The original piece is very small and couldn't be molded with less material. It looked way more robust than the real thing, so I set to "improve" it replacing the back supports and armsrests. As could be anticipated, I ruined the original part.
So I made a new seat base by cutting/filing/sanding a bit of thick sprue. I cut four small recesses to hold the wire lenghts later, using a drill bit and some shaping with a pointy blade. I made the seat cushion and seat back using styrene bits with their sharp angles rounded up with sandpaper.
The very difficult part was to make the curved armrests with copper wire: making two small curves with ends angled to 90º and making them symmetric was a struggle. I found a method (more or less effective) of making both curves simultaneously using a doubled straight wire (one long piece folded on itself first). Then after measuring up the armrests against a drawing, I marked each end and folded them to 90º and trimmed the ends to 1mm of lenght. Took a few tries! The back rest supports are straight, and slightly easier, but the lenght of them must be precisely measured up to match the armrest ends folding behind the seat back. To glue two pieces of plastic and four wires together at the same time made a simple jig with lined card and sticky tape. Once the CA glue was set I separated the seat and added it to the kit piece of the seat base and brake lever. I only have to add a clutch to the lever's handle and a small arm to connect the brake line under the base.
I attach here some photos of the original kit part, a drawing from the manual and period pics of the seat in place.
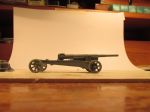
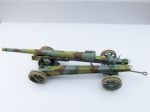
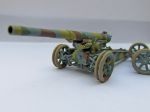
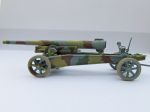
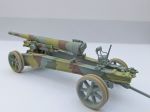
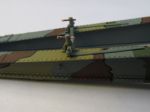
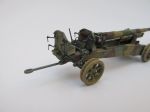
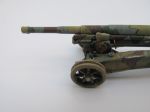
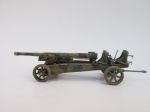
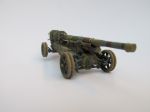
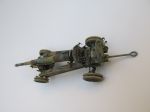
Yesterday I painted up the camouflage on the 155GPF. Over the greyish blue base I added areas of yellow ochre, medium green and chocolate brown, interspeded with black lines. On the pictures I see that the breech of the cannon often looks darker than the rest of the cannon in period pictures. Perhaps this part "charred" any paint coat on this area? Which colour should I paint it?
TIA!
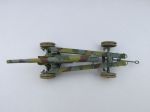
Thanks guys! The tyre colour was taken from my own car (which always seems to have visited Passchendaele in 1917). I'm not too happy on how it looks now and I guess I should have used more chalky grey instead of too much brown in the paint mix. Anyway I'll have to see how it looks once I finish it with a dusting o pastel chalks and put in a suitable base when the model is finished. The idea for this colour is that rubber tyres seldom look dark gray once they roll over dusty roads for a short period of time. Speaking of the paint finish, I feel that as it looks in these images, the jazzy camouflage colours should be subdued a little with a greyish glaze. As I could see, these cannons relatively sooty (or dusty) in field conditions. Besides the French poilu seem to be people little disposed to hygiene in general...
Here's a new installment of pictures from the 155mm GPF build. Hope I'm not boring you to tears.
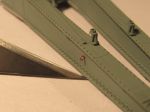
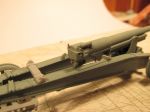
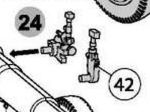
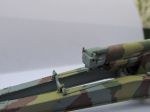
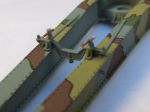
Here's the bar on which the breech of the cannon was fixed in travel position. It has two adjusting screws with handles. The original parts were somewhat too large for the small place where they should sit, so I made new ones from sprue and copper wire.
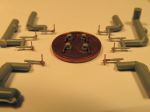
Small jobs: They are (on the 1 Cent Euro coin) four screws with handles that fix the cannon "fléches" in firing position. On travel position they are left in the locking lugs. The original parts lacked the athwarts handle, that I made with a snippet of copper wire and CA glued on a side. The rest of the thingies are small locking arms that shall go on each cannon spade, fixed to the ends of the fléches. They needed a handle as well, but of a smaller gauge of wire. I left these thing on the sprue until time arrives to glue them to each spade, because they're very small and easy to get lost. Once again, the amount of detail of the RPM kit is stunning!
The locking screws on position, before being painted. On period pictures they seem to be of a darker colour than the rest of the cannon carriage.
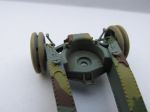
That mechanism for elevating the gun is nested inside the carriage, but it'll be no more visible once I put the cradle and the barrel over it.
Here are the transverse bar locking screws again. I attempted to make the end stops of the handles with small drops of superglue, but I'm not sure how they'll look once these things get a coat of paint. It'll look like crap, probably.
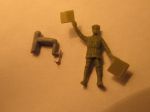
Another view of a spade arm lock again. There are four for each spade and each of the eight was a pain to make. The red traces on the plastic is a dot of Sharpie ink that helped me see where I should drill a hole for the handle. The little green man looks tired here, so I ended the photo shoot at that moment.
-- Edited by d_fernetti on Monday 4th of August 2014 11:59:37 AM
-- Edited by d_fernetti on Monday 4th of August 2014 12:17:37 PM
-- Edited by d_fernetti on Monday 4th of August 2014 01:28:37 PM
Thanks a lot Gilles! Now on to building the next, the 155C by Ace models!
Only second - in Rosario they must have some really excellent modellers. Your modelling skills put me to shame! I have built the Ace 155mm 1917 currently available - nice models and looks good when finished. By the way Ace also has two more models this year based on this model.
1. 72544 cannon de 155C model 1918.
2. 72547 US 155mm howitzer m1918 with pneumatic wheels.
Hi RCD, Well, I can only say that perhaps in Rosario we have very lenient contest judges! I have the references ready for the Ace kit, and I guess that the newly announced model are just reboxings of the same, plus one new sprue for the pneumatic wheel variety.
-- Edited by d_fernetti on Friday 8th of May 2015 05:54:06 PM
Hi Luca! I have the healthy habit of accepting praise no matter when! However, the merit of this model, if you liked it, was more of the toolmaker than on myself. It's a great little kit and I wish I can add a tractor vehicle to it somewhere in the future. There's a nifty resin kit by "Beck" of a Renault machine that would complement this thing neatly. I also wish to make a scenic base for it, a scene of the cannon being towed into a town road, a frequent theme of photos of the period (I imagine that the town photographer seized the chance to portrait the visiting troops and their infernal conveyances).
So I can consider this model as a start more than a fully finished project.


 However, the merit of this model, if you liked it, was more of the toolmaker than on myself. It's a great little kit and I wish I can add a tractor vehicle to it somewhere in the future. There's a nifty resin kit by "Beck" of a Renault machine that would complement this thing neatly. I also wish to make a scenic base for it, a scene of the cannon being towed into a town road, a frequent theme of photos of the period (I imagine that the town photographer seized the chance to portrait the visiting troops and their infernal conveyances).


