Its has been a while since I have had an opportunity to posted a WW1 build. However after seeing the excellent paper model build by Charlie C in QMHE Brisbane last year, I decided to have a crack at building one myself from the same plans.
I was concerned that the size and weight with interior detail would be structurally not possible in styrene let along to any scale thickness. So after some trials with materials, purchasing some machinery and searching for a suitable bonding medium, I successfully started to build this model from the paper plans by transferring them to the aluminum sheet. This material provided the ability to be reasonable accurate to the thickness of the plate that the Little Willie was built from, but also provide structural rigidity. The plans are very good, though they miss some detail and sometimes the 2D paper model is just not suitable for the 3D build. In 1:18th scale this is not a small model at 330mm long without the steering trail.
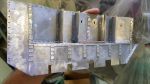
The following image shows the inside port side of the model well under construction.
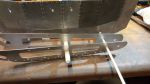
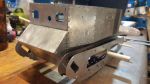
3/4 view of port side an front during alignment test.
I will post more images of the progress as I go along. Hope you like it.
-- Edited by kandos on Wednesday 7th of June 2017 03:04:05 PM
What sort of Aluminium sheet are you using - it looks as if it's a fairly soft grade? It looks as if the rivets are made by punching the aluminium into a die - is this right?
You are correct Charlie. I made a punch tool. They are punched from the back. I cannot remember the actual thickness but I found the easiest source was bunnings hardware. Large sheets are about $30. Can find out if you need to know the sizes. It is quite soft, relatively to some other plate that i tried, but t Have used just over one sheet with some experiments and trials and errors along the way. So the material costs have been small. The machinery to bend, cut etc has been the expensive part.
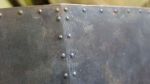
I experimented with beads and actual rivets, but found this to he satisfactory. Once you bond the opposing side which also has rivets you cannot tell. I will post some images later with close up of the rivet detail on the chemically treated section on the outside port side.
The parts are bonded with a two loctite products. Loctite company was helpful in recommending products, i then went searching for commerical products from the MSD sheets. The first is a primer which must be applied immediately after cleaning. I clean with acetone, then buff the area with a very fine grade sanding stick then appiy the primer. If you dont prime the product does not bond well. I then use a rubber impregnated gel instant adhesive. This bonds but still provides a flexible joint. It is strong when fitted well or compression clamped with pliers etc. I have dropped the model and parts and it still holds the joint. I will post more about these products later.
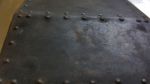
The following images are from the chemical etching test on two rear port side panels. I think it looks more like steel plate after treatment rather than alum. This is without any washes. I like how it really brings the rivet detail out.
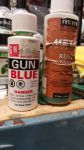
Fruil tracks are white metal - there is a blackening product by MIG but I'm told this is slow to work and the finish can be unstable.
A better (and cheaper) product is the blackening solution used for lead light windows - works fast and the coating seems to be stable.
Charlie
Thanks Charlie. I've used the MIG blackening product and it works ok but its pretty expensive. I'll have to check out the solution for lead light windows suggested. You can probably buy a quart for the same price as 6oz of the MIG stuff.