Landships II

Members Login
Username 
 
Password 
    Remember Me  
Post Info TOPIC: Tread's British Tank Group Build entry #2 :-)


Major

Status: Offline
Posts: 134
Date:
Tread's British Tank Group Build entry #2 :-)
Permalink Closed


Howdy All,

In an attempt to focus some attention on our ongoing 'British Tank' Group Build here at Landships.com, I am posting some preliminary photos of my second entry. Again in 1/35th scale {I know most of you fellas prefer the Braille scales...}.
It is the Mark IV British 'female' tank, manufactured by Emhar. I decided to build this kit after the recent attention that the British Mark's were receiving here at the site.
With any luck, this build will do justice to these remarkable Landships....

Here I go....

I have read thru a couple of kit reviews on this kit, and quite honestly was prepared for some ill-fitting pieces, especially the track horns. But, after looking closely at the parts, and spending a decent amount of time test fitting and barinstorming the fit 'issues', I attempted to glue everything together with my 'adjustments' in mind.....

Below is a pic of the lower hull section with the lower track horn piece glued on...


Now, it needs to be said here that this is not the way the instructions supplied in the Emhar kit say these pieces should be assembled, but I honestly found fault with the way Emhar says to do it so I proceeded with my own non-linear {as per the instructions} method...
It has been stated that one of the 'issues' with this kit is the fit of the track horns, and their alignment with the drive/idler sprockets. If this kit is just simply glued together I don't doubt that there would be some fit issues. One of the small adjustments I made was to file down the end of the lower track section so that it was flush with the end of the lower hull piece {pointed out by the arrow in the pic}

Here is a pic of just how much of an overhang there is initially....


Once I had shaved this down till it was flush with the lower hull piece {which is what it was supposed to be in the first place}, I then proceeded to glue the rest of the pieces that make up the hull 'box' together by quick gluing them together and them placing the 'box' on it's side on top of a standard sheet of quadrille paper to ensure proper alignment. This 'box' was then allowed to dry for a bit, and then I applied a few drops of CA glue to the inside seams to strengthen the rather tenuious bond points...


Lastly{for now 
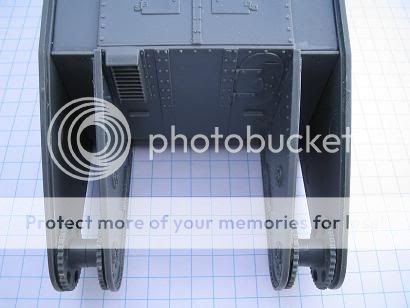
}, I wanted to show you a close-up of the better aligned rear hull plate {#1}, rear inside sponson plate bond {#2}, and the {hard to see} straightened rear drive sprocket angle {no number}....
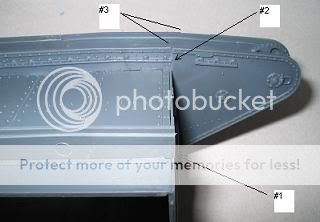


The #3 arrows are pointing at the bottom edge of the inside and outside track sponson joins that will be lightly filed down so that both pieces will be straight and lined up properly...

My apologies for maybe being to 'A' type about this build, but I have always wanted someone else to be so piqeun {sp?} about spelling-it-out when it came to just how they overcame a kits limitations.....

regards,

Tread.

-- Edited by Treadhead at 02:31, 2006-02-04

-- Edited by Treadhead at 02:32, 2006-02-04

__________________
"....You're a better man than I, Gunga Din..."


Field Marshal

Status: Offline
Posts: 498
Date:
Permalink Closed

Treadhead
great start to your number 2, and ill use some of your tips in my Mk.V project as its slowly moving forward as well, Ill update soon!


*we really need the group build thing sticky*

__________________


Major

Status: Offline
Posts: 134
Date:
Permalink Closed


eugene wrote:

Treadhead
great start to your number 2, and ill use some of your tips in my Mk.V project as its slowly moving forward as well, Ill update soon!


*we really need the group build thing sticky*


Howdy eugene

Thx for taking the time to stop by and give my thread a look-see. I have been following your build as well and have enjoyed what you have shared with us...in fact, your mention of the rear hull back and top plate join issues you were having was one of the 'flags' I was paying attention to in an attempt to avoid a bad fit.

As hopefully a bit of a help, and maybe a method to avoid a bad join like that, here is a pic of the same join on my Mark IV female after having performed my small 'adjustments'.........


What do you think?

reagards,

I'm off for another cup of

Tread.

__________________
"....You're a better man than I, Gunga Din..."


Field Marshal

Status: Offline
Posts: 498
Date:
Permalink Closed

ah thats a great fit, ill definatly use that picture in my building, I am moving right now so no modeling at this moment


__________________
Page 1 of 1  sorted by
 
Quick Reply

Please log in to post quick replies.

Tweet this page Post to Digg Post to Del.icio.us


Create your own FREE Forum
Report Abuse
Powered by ActiveBoard