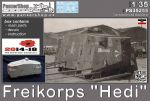
Hello folks, I have started work on the Panzershop 1/35 Hedi (conversion) recently, and thought I would post a WIP series. There are a few people on here that are interested in this vehicle (or tank if you prefer). I won't go into the history of the tank, there are people on this forum that know it better then I do.
The conversion says to use the Meng A7V kit for the bottom half of the tank and other small parts. I had a Tauro 1/35 A7V sitting on the shelf and at 15$ when I bought it, this is what will be used. I can't see using the Meng kit at the prices that it is going for.
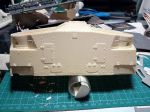
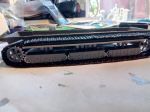
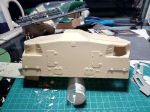
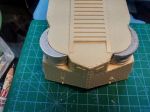
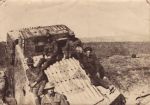
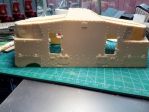
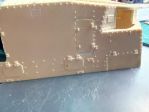
Looking over the resin shell of the tank, I saw that it will need a bit of work. The main problems that I saw was the the "turrets" on the corners were too far recessed in as compared to the pictures that are out there. This was going to be a problem that needed to be remedied. Picture 54 Hedi-2 shows how it looks compared to the resin model picture Hedi 1 and Hedi 3. And speaking of the picture Hedi 3, you can see that the louvers on top of the kit are very basic. I'm not quite sure what I will do with this part yet. There is also a small "hatch" of sorts on top there. But I do not have any pictures that clearly show it. I have emailed Panzershop asking if they had any reference for it, But I have not heard back from them yet.
I will post more as I progress. If anyone has any comments on how to "accuratise" this kit please let me know.
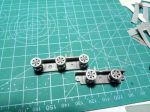
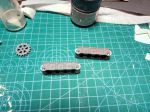
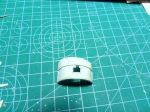
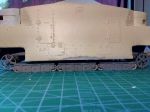
Ok, I have started work on the lower section-chassis of the Tauro A7V, it's very basic, and I can see the difference between the Meng kit and this one. The main sprocket / Idler wheels are thicker in comparison. The spokes are thicker on the Tauro kit. I Spray painted the bottom in Tamiya XF-66 light grey. The wheels are painted in Testors steel paint, and slightly buffed to represent a wear on them.. that is all i was able to do in one evening.. next will be the track links..
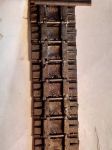
Ok for those of you that have insomnia, making interlinking tank tracks is for you. I spent the night working on these. I don't remember how many there are per side.
But my bloody fingers show the work. My tweezers were broken so I had to use my fingers to push the metal (pre-cut) pins through the nylon tracks (at least I think
they are nylon) Tauro does give you an ample supply of pins in case you lose some. It was not an easy matter to push them through, and in some cases the nylon material
got ripped, but a small amount of cyanoacrylate glue held them in place. After about 60% doing each side I test fitted them on the main chassis. Making sure that it all
was a snug fit. After completing the rest of the tracks I did a final test fit and will close the final link after the main Hedi tank body is done and ready to be placed on the
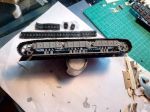
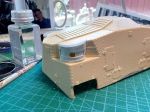
chassis. The next step is the " turrets" that need to be re-done. I'm not looking forward to this part at all.
Following this thread as I want a Hedi in 1/72 scale. I have the Tauro kit in the basement. An awful kit. As you are going to modify the hull you might want to take a look at the boogies to. Tauro missed the the long plates at the bottom of the boogies, that seems to steer the tracks. I haven't checked how visible they are on Hedi but on the standard A7V it was after the bottom parts of the hull was modified on the tanks.
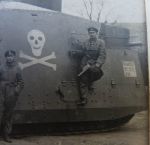
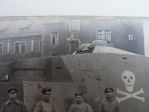
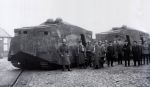
The Hedi (and the 54, (which I think was the Abt number 154 ?, but I can be wrong) The turrets on the right and left sides are different from each other.. Also each corner is a duplicate of it's front and back. So the front right turret is the same as the Right rear turret, and this also goes for the left sides.
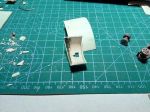
I was not quite sure how to do this, I guess there are different ways of changing the turrets. I decided to cut out the turrets that are there and Insert new ones. I used a thick rod (not sure of the circumference, but it did fit) I cut out Evergreen plastic sheet to the correct sizes for each corner.
I started with the right corner first. Bending and gluing the different sheets around the rod, till I felt it was the correct shape, constantly checking it's fit with the slot that the original turret was in. Once i was confident that the turrets look correct. I let the glue sit overnight, 2 down 2 to go !
The more I compare the resin model (shell) to the various pictures, The more I wonder if I took on a bigger project than i intended. Besides the turrets being too shallow.
all the doors and hatches are raised. If you look at the pictures of the Hedi all the doors are flush with he body of the tank. Even the small windows are flush with the body.
I'm not sure what to do with this. Do I sand it all off and re scribe them. I do not want to think about it at this point. I have my hand full with the turrets.
I guess it sits about the right height. I noticed when looking at pictures that Hedi didn't have the plates at the bottom of the boogies as I mentioned earlier so no need to build them.
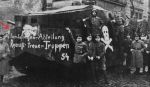
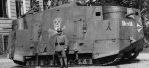
The "plates" were on it in the beginning. You can see how clean Hedi looked in the port (left) side picture. The starboard (right) side picture shows more weathering on it.
I would think the crew took the plates off for ease of maintenance work. As for the model, I am going to try to make a rubber mould (mold, I have seen it spelled both ways)
and do a resin casting of the 2 turrets. It takes way to long to make them one at a time. So that's coming next. still trying to decide on what to do with the doors. I have spent a few
hours re ascribing all the panel lines. The edge have a "soft" look to them. I am not sure how many of these kits were made, but after a while the mould becomes worn out and the
It isn't the plates on the bottom of the hull I was thinking of. I referred on the long plates at the bottom of the boogies that I suppose steer the tracks.
They are present on the A7V tanks but seems to be missing on the Hedi so the Tauro boogies are correct for this.
It isn't the plates on the bottom of the hull I was thinking of. I referred on the long plates at the bottom of the boogies that I suppose steer the tracks.
They are present on the A7V tanks but seems to be missing on the Hedi so the Tauro boogies are correct for this.
Just an update, I decided to make resin copies of the turrets, it took me far to long to make each one. To make duplicates would be even longer, since they would have to be exactly the same.
So I called up a few places that sell rubber-silicone-rtv moulding material, and resin, and have ordered them. So I'm just waiting for that. The people I talked to all said that before i use any of the moulding to make small test runs. This is because I used tamiya putty, squadron green stuff, and cyanoacrylate glue on them. The moulding material may not cure at those areas, and I will have a mess there.
They recommended that if I find this to be true, to use Krylon Crystal Clear paint to cover them completely. To make sure that they sit and dry for a full 24 hours, so as to have all the gas in the paint evaporate from it. And then to use the moulding material.
Till then, I'm just re- scribing all the panel lines. The one thing that i am trying to figure out is the air vent / louvers on the top of the tank. I looked at the Meng photo-etch screen for it, but those will not fit Hedi. The only picture I have seen of the louvers on top of a A7V is this one. Maybe I will just leave it as it is. Not sure yet. More work ahead.
Hedi's louvre aren't anything close to the standard A7V. I haven't seen any good pictures of Hedi's top but what I've seen resembles what seems to be on the kit.
There is another thing that I noticed on both this kit and the 1/72 kit. There are small rectangular hatches moulded on the hull but looking at pictures they shouldn't hatches mounted on the outside. They look like they are mounted from the inside and lies flush with the hull so they should just be scribed in to the hull or perhaps just a hole.
Looking at this build makes me wand Hedi in 1/72 scale.
-- Edited by Orso on Thursday 13th of August 2020 10:10:46 PM
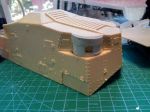
The doors, and hatches are all flush-level with the body of the tank. This kit has them raised. I am trying to decide on how best to re-do this. either sand them all off and re-scribe.
or replace them totally with new ones. see picture.
I have been looking at the 1/72 scale kit trying to decide if it worth buying or if I shall have a go at converting the Emhar A7V instead.
The 1/72 kit has the same problem with doors and hatches not sitting flush and it seems like the doors on the left side is wrong having the hinges at the rear so that need changing to. The turrets look OK though and I think the louvres are better on this than the 1/35 kit. The hatches at the rear behind the sprocket wheels are also missing so there are things to correct on that kit too.
I think I've spotted another problem on your kit. The small hatches (where the exhaust pipes protrude) seems to be placed wrong. Looking at pictures I feel that the front of the forward hatch should be inline with the rear of the door while the rear hatch is placed more under the door like the kit
thanks for pointing them out. I have not gotten that far along to see all the mistakes. I'm going to have to review the pictures more closely.. Thanks.
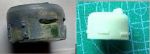
This weekend was quite frustrating. The new moulding / resin material came in, and I tried to make the mould casts for the turrets, mudguards, and the copulas.
First the copula didn't look right to me, the vision slits are extended when they should be recessed (see pictures). So I made a mould casting of it, and redid
the vision slits in it, by placing small pieces of plastic sheet into the slots. This extended into the copula interior, and would have given the casted copy an
recessed vision slit. I also made the moulds for the turrets. and the mudguards using the Meng kits mudguards. As I said before, the Meng kit is quite expensive
and I plan to make the A7V from it, so I am not going to take parts away from it. I am using a different resin then I have in the past, after pouring it into the
moulds I let it sit overnight to make sure it had cured completely. To my surprise the resin was still tacky in texture, and there were literally hundreds of bubbles
in the castings, totally ruined. Even taking the castings out of the moulds ripped them apart, now i have to make new moulds of the turrets and copula.
The only thing that came out somewhat ok is the mudguards. They are usable with a little cleaning up.
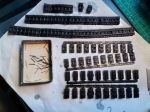
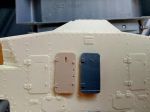
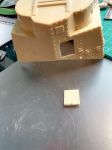
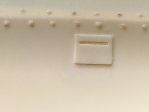
The other thing that I am looking at doing is re scribing all the hatches and doors. As you can see by the picture the Hedi door, Meng and Tauro doors are all
different in sizes. the closes is the Tauro door. So I will need to just use what is there on the kit. The other thing about the Hedi door. it is 1/4 inch about 6mm
too low, it needs to be raised up that much. I may just make another set of Tauro doors and use that in their place. Just sand off the doors all together.
I have ordered some Grandt line rivets and hope to get them in the next week or so. For all you people that go to the modelers conventions (not recently), the
name rivet counter is very appropriate. Yes I will need to count all the rivets in the pictures and work them into the model. The one thing I am trying to figure
out is the vents / louvers, are those rivets, or tube holes..
The only thing I have done the past day is try to salvage one of the scapula's that I casted. This needs a bit more putty and sanding, but I think I can get it
just right. I used the tip of a metal file that was the right width for the vision slits. Just a bit more putty in a couple of the slits to make them correctly shaped.
Then I will make a mould of it and cast 2 new copulas for the Tank. I plan to put a very slight flare at the bottom of it. to look like the one in the picture. Then
scribe a ring just under the vision slits to show where the two sections are. This is taking longer then i expected to do.
It has been a while since I posted a progress report. I have tried 4 different times to make copies of the turrets and copulas. All 4 times have been failures,
either the moulds or the resin has had problems and nothing came out well. I have ordered different moulding / resin materials and will try again soon.
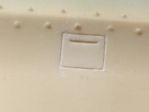
During the past weeks I have been re-doing the vision ports and the doors on it. All the ports and doors are recessed flat on the actual tank, nothing is raised.
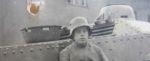
I Have cut out all the doors and the rear excess hatch (I'm not sure if this is an emergency exit hatch or what, But I have seen a picture of a couple crew members
sticking their heads out of it, so it can be an exit hatch) The picture that shows the excess hatch is quite blurry, and I can not see the rivets that are on it that well.
I believe they are different in size and location to what the model has, so I cut them off. Even the size of the door is smaller in the picture to what the model has.
I used the piece that I cut out and re-scribed it and put it back in, using a razor blade, I made sure everything was level with the body of the tank. A few drops
of cyanoacrylate glue set it in place. I used Tamiya putty around the edges of the original cut lines and will sand it flat when I get to that stage.
The doors were next, this took some time to do. The thickness of the resin model is approximately 1/6 inches thick (4.2mm to you metric folks). I used a dremel
tool, and burred out 90% of it from behind each door edge. This made it easier to cut with a new x-acto blade (I'm glad i bought the 100 pack when it was on sale).
At this point I raised the door (1st attempt) about 1/6 higher then where it had been. The pictures of Hedi shows the door to be higher up then what the model has.
I filled in the lower part with sheet polystyrene and puttied it all up (also to be sanded when that time comes) I have to repeat this process 3 more times with the
other doors.
The vision ports were next. I re-scribed the vision port deeper to make sure that i have them right where they should be. Then I sanded it flat. I am not looking
forward to doing another 9 vision ports ! And I am not even half way done with this model. Much more to do. That is all for the time being, I'll post more as I go