Landships II

Members Login
Username 
 
Password 
    Remember Me  
Post Info TOPIC: Woodworking issues!?!


Hero

Status: Offline
Posts: 808
Date:
RE: Woodworking issues!?!
Permalink   


Thank You Martin, You've given me a few things to think about. Never thought of chemical colouring the plates. A black/brown colour would be nice, add a bit of wear & tear and I think it would look about right.

One option maybe to find a harder form of aluminium... just found one classified '5754', they use it on tread plates, so a possible.

I can't wait to see one of your Tanks rolling along in bear metal, such a shame to hide all that work... but got to be done.

Helen x


__________________


Sergeant

Status: Offline
Posts: 47
Date:
Permalink   

Hi Helen,

if you use steel for the plates, you have to take a kind of steel sheet what is deep drawable. It is not much stronger than hard aluminum, but less expensive. Specific weight of alu is a third of steel, but still hard alu will be too soft for a tank in 1/6.  Anyway, it will nothing be better than steel plates.  The best way would be, get some material, and try it. The most important thing is that these steel plates will rust, where the paint is rubbed off, and that gives an authentic look. You can press these plates in big bench vice, if you build an equipment for it, or you try to get a stamp press like shown in a photo in my post before.

Regards,

Volker


__________________

... regards, Volker

MRG


Major

Status: Offline
Posts: 121
Date:
Permalink   

Yep, steel would be ideal.

Helen, if I have read correctly in your other thread, you are thinking of building the Mark I also in 1/16 scale. The track plates on the Mark IV are the same, to my knowledge.

I am still experimenting with brass to achieve the true shape for the track plates but I think I am getting there. Anyway I will be happy to share the outcomings, like the exact shape of the stamp and die with all of you.

Weeks ago I tried to find out which type of steel would be malleable enough but all I can find are odd data sheets which I am not into enough to understand. And then getting it in 0,7 mm thickness seems to be the next limitation.

If this track thing can be solved in a reasonable manner, then hello Mark V, Whippet and Artillery carrier!  biggrin

Steel could also be chemically blackened, phosphorous acid (rust transformer or Coca Cola!) would do that. One could also try it the way they did in the Lincoln factories, carbonize it. Now that would be authentic!


Best regards,


Martin


-- Edited by MRG on Tuesday 4th of November 2014 06:03:35 PM

__________________


Hero

Status: Offline
Posts: 808
Date:
Permalink   

Thanks guys!

I've had a look around and yes it gets very confusing when reading up on metal specifications. Basically it looks like standard mild steel is the metal of choice, not to much carbon so it forms easy, but still harder wearing than aluminium. 

So I've now drawn up a cutting nest for track plates and sent it off to the Laser Cutters. What I have done is ask them for a quote and some advice on the metal side of things. 

I'm still not sure what to do on the pressing side of things, but I'm thinking along the lines of getting some lumps of metal laser cut to resemble Volker's setup, then seeing about finding someone up to the job of pressing them. Not keen on doing that part myself. Just the size and weight of the presses necessary is enough to put me off. 

As for the 1/16 scale build, I intend to design some plastic tracks and leave it to the After Market guys or Scratch Builders to make something in metal.

Helen x


__________________


Hero

Status: Offline
Posts: 808
Date:
Permalink   

Look what I have coming!!!! :) 

Christmas is coming and I'm getting exited about a box of metal... I need my head testing.  Just got to get the metal track pads sorted and it will be running time in the New Year. 

Helen x


Attachments
__________________


Hero

Status: Offline
Posts: 808
Date:
Permalink   

The Track Links are here!!!!!! :)

Two boxes of handed track links arrived today. I've had a quick check of of the links, placing them on a 3D printed piece of track plate... rivet holes are spot on! Phew!

There's still some clean up work to do, but I have the scale-ish links I always wanted.... now for the Track Plates.

Helen x


Attachments
__________________
MRG


Major

Status: Offline
Posts: 121
Date:
Permalink   

Hello Helen,

this is almost pornographic material.  biggrin  The tracklinks look great!


Best regards,


Martin


__________________


Hero

Status: Offline
Posts: 870
Date:
Permalink   

Nice carpet as well

__________________

 The finest stories of the Great War are those that will never be told.


Hero

Status: Offline
Posts: 808
Date:
Permalink   

Ha ha! I worry about you two. Some times I wonder if I'm a little insane... but then I remember it is just the company I keep!

Thanks for the complements guys, it wouldn't have been possible though without finding a metal caster willing to take on small but monotonous job and still do it to such a high quality. I got really lucky.

Oh god don't mention the carpet, it's hard work stopping it looking its age.no

Tonights job is cleaning up 200 lefthand & 200 righthand track links. Anyone want to help? Hey come back! Stop running away!!!!! :)


__________________


Lieutenant-Colonel

Status: Offline
Posts: 179
Date:
Permalink   

Now I wonder if that could be done in 1/72? 

And presumably you are preparing a bonsai tree Hatfield Park for the trials?confuse


__________________
MRG


Major

Status: Offline
Posts: 121
Date:
Permalink   

I doubt it could be done for 1/16...which would be my number. At a price short of needing to win the national lottery first, at least.

And - bonsais are too expensive to run over. no All those Japanese hearts breaking, along with the treetrunks.


__________________


Hero

Status: Offline
Posts: 808
Date:
Permalink   

Ok that's it, I'm getting far to excited about bits of metal turning up, I need my head looking at! smile

Todays arrival is the laser cut metal for the track plates. I went with 1.2mm mild steel in the end. The extra weight and possible difficulty in pressing 1.5mm plate put me off going so thick. As it is, each plate weighs very little, but picking up the box of 190 I think it has doubled the weight of the aluminium links.

Along with the track plates I also had some extra metal cut to make the Press up out of. Had an extra pressing blade cut just in case I do something wrong. 

So getting closer, just have to push hard and get my little tank moving.


Sorry about a few of the photos being blurred.

Thank you Volker  for your post on how you made your track, it has been a great help.

Helen x


-- Edited by MK1 Nut on Friday 16th of January 2015 09:51:52 PM


-- Edited by MK1 Nut on Friday 16th of January 2015 10:01:06 PM

Attachments
__________________


Sergeant

Status: Offline
Posts: 47
Date:
Permalink   

...looks good,...Heavy Metal...

...and you´re very welcome.  wink

Volker


-- Edited by Schnuck on Monday 19th of January 2015 09:28:59 AM

__________________

... regards, Volker


Hero

Status: Offline
Posts: 808
Date:
Permalink   

I DID IT!!!! biggrin

No not finish the Model, but I have succeeded in pressing some track plates... officially over the moon. 

The plates are 1.2mm mild steel and the first few attempts put up such a fight that had my doubts if I could do it all myself. There's a few little tweaks still needed to get the shape just right, but I'm happy to have a few links to look at and know that it is now just a matter of hard work and time.

Helen x


Attachments
__________________
m83


Sergeant

Status: Offline
Posts: 38
Date:
Permalink   

MK1 Nut wrote:

I DID IT!!!! biggrin

No not finish the Model, but I have succeeded in pressing some track plates... officially over the moon. 

The plates are 1.2mm mild steel and the first few attempts put up such a fight that had my doubts if I could do it all myself. There's a few little tweaks still needed to get the shape just right, but I'm happy to have a few links to look at and know that it is now just a matter of hard work and time.

Helen x


Those look fantastic Helen, well done. You ought to be very proud of your efforts, it just goes to show that having the patience pays off. 
it will all be worth it in the end.
kind regards Kev


__________________


Sergeant

Status: Offline
Posts: 47
Date:
Permalink   

...well done, I´m pressed ... ähhhh impressed

smile

Volker


__________________

... regards, Volker


Hero

Status: Offline
Posts: 808
Date:
Permalink   

Volker, that's bad, very bad! no

biggrin


Thanks Guys, still a lot of hard work ahead, but at least I now know it's a case of 'when' it will run, not 'If'.

Helen x


__________________


Hero

Status: Offline
Posts: 808
Date:
Permalink   

Well I managed to press 130 track plates this afternoon. Not expected to get the chance today, so glad I managed to knock such a big whole in the 200 I have to do. smile

Had a great day with the guys in the Boat Club at the Fleet Air Arm Museum Model Show yesterday. Although the Tank hasn't progressed much recently, it is always good to chat with the public and other modellers and show off the first few links of track.


-- Edited by MK1 Nut on Monday 23rd of February 2015 04:44:42 PM

Attachments
__________________
MRG


Major

Status: Offline
Posts: 121
Date:
Permalink   

Impressed here too... I wish I was that far with mine... hmm 
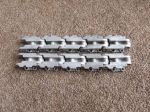
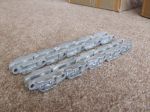
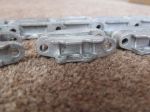
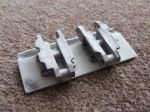
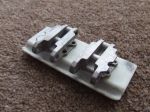
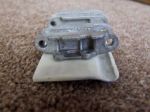
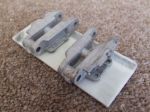
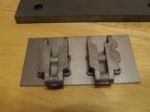
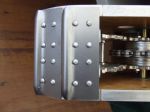
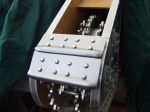
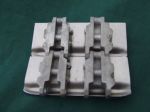
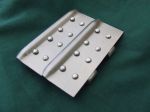
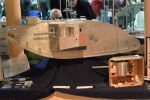
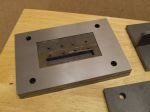
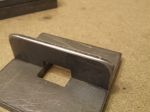
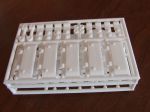
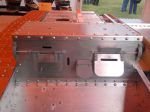
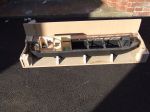
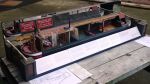
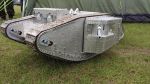
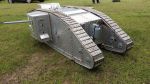
Still trying to work out the ideal shape.

Would you have a picture of the stamp itself? I mean the part that presses into the plates. That would be of great help.


__________________


Hero

Status: Offline
Posts: 808
Date:
Permalink   

Hmmm, a lot of it is done by eye, so hopefully a grabbed image of the cutting plan for the parts and some photos of the final Press will help you finish your Fleet of Landships.

As you may see in the photos I had to move the sheet that holds the Track plates in position back a little, the pressed lip was to close to the rivets.

Helen x


Attachments
__________________
MRG


Major

Status: Offline
Posts: 121
Date:
Permalink   

Hello Helen,

fantastic, thank you! So you went for the fully shaped stamp and die. That is what I originally had in mind - but with the size I am at, it is difficult to achieve without help of serious precision machinery.

I follow Volker's system with a bit of thinner material pressing into an open shape. Which works once you get the shape of the stamp right, which I am still trying at.

I also encountered the effect with predrilled plates moving while stamping, so I drill the holes after pressing, using the ones in the die as a guide.

What's your system for trimming the overlap? I myself trim both ends after the bolt holes are in, to the exact length in both directions and then cut/file the stamped area along the surface of the die to get it.


With best regards,


Martin


__________________


General

Status: Offline
Posts: 344
Date:
Permalink   

Helen,
I may be in sunny Cuba, but I am watching with interest.

__________________

Regards TeeELL

Growing old is compulsory, growing up is optional.


Hero

Status: Offline
Posts: 808
Date:
Permalink   

MRG wrote:

Hello Helen,

fantastic, thank you! So you went for the fully shaped stamp and die. That is what I originally had in mind - but with the size I am at, it is difficult to achieve without help of serious precision machinery.

I follow Volker's system with a bit of thinner material pressing into an open shape. Which works once you get the shape of the stamp right, which I am still trying at.

I also encountered the effect with predrilled plates moving while stamping, so I drill the holes after pressing, using the ones in the die as a guide.

What's your system for trimming the overlap? I myself trim both ends after the bolt holes are in, to the exact length in both directions and then cut/file the stamped area along the surface of the die to get it.


With best regards,


Martin


 Hi Martin,

With the couple of test plates, I used a hand saw... not fun but wanted so much to see what they would look like. 

The model boat club has a bandsaw and I'm thinking that I will get a nice new blade for that and use some kind of jig to hold the track plates. Another long, long job but starting to see the end now and getting exited.

I did think of using some kind of metal shear but was scared the pressed part might get distorted and ruined. May try it on one of the spare ones though.

The plates I found moved quite consistently and so once I adjusted the thin plate that holds it in place, they all came out the same.

Helen x


__________________


Legend

Status: Offline
Posts: 1626
Date:
Permalink   

Hi Helen its all looking very impressivewink

On the shear Vs band saw, have you thought of using a cropper? I think it would work well enough and be a lot more user friendly/safer... try a pair of mole grips with some suitable plates welded on for gripping the track plates withsmile


__________________

"Ash nazg durbatulûk, ash nazggimbatul, ash nazg thrakatulûk, agh burzum-ishi krimpatul"


Hero

Status: Offline
Posts: 808
Date:
Permalink   

Ironsides wrote:

Hi Helen its all looking very impressivewink

On the shear Vs band saw, have you thought of using a cropper? I think it would work well enough and be a lot more user friendly/safer... try a pair of mole grips with some suitable plates welded on for gripping the track plates withsmile


 My Dad has also questioned the use of a Bandsaw over using a properly set up set of Shears, it seems to be the way everyone is telling me to go. I have some spare Track Plates to practise and set up on, so will give it a go. 

The other reason for trying the shearing route, is I will probably kill the Boat Clubs Bandsaw cutting up nearly two hundred bits of metal. :)

The cost of a couple of blades and possibly a new machine has got me thinking of purchasing a bench shear and then donating it to the club when I'm finished as a thank you. It will cetainlt save my ears and my nerves going the shearing route. 

I will let you know how it goes.

Helen x


__________________


Legend

Status: Offline
Posts: 1626
Date:
Permalink   

Hi Helen, just make sure you have a few spares in case of accidents and the cropper/bench shears should do what you want as 1.2mm is not so thick so it shouldn't be a problem, you can also go round curves wink

One with 6-8 inch blade should do it, not really a lot to go wrong with a croppersmile


__________________

"Ash nazg durbatulûk, ash nazggimbatul, ash nazg thrakatulûk, agh burzum-ishi krimpatul"


Hero

Status: Offline
Posts: 808
Date:
Permalink   

Hi Ironsides, I went with a 6 inch cropper in the end... did the job nice and easy. Much less noisy and scary than a bandsaw. smile 

Ok it took a while to file them all down, but all the plates are now ready. 

I'm still cleaning up the holes in the links to take the pins, all getting so close now, I so need to see this ship move!


Today I had a little parcel from Shapeways. It was the Fittings Set I drew up for hinges and locks and things. Can't wait to add some detail. :)


Attachments
__________________


Legend

Status: Offline
Posts: 1626
Date:
Permalink   

Glad it all worked outsmile there is a foam sanding drum available from Black and Decker that's useful for cleaning up sheet metal work .. though it does take some practice.. mine is mounted in a half HP bench grinder.... wink


__________________

"Ash nazg durbatulûk, ash nazggimbatul, ash nazg thrakatulûk, agh burzum-ishi krimpatul"


Hero

Status: Offline
Posts: 808
Date:
Permalink   

Hi All,

I couldn't resist throwing some photos on from yesterday, the quality are a bit poor but they show the Tank with track on one side. :)

With luck I will have some better photos to show you tomorrow when my friends email me them. The other side of track will probably take another week or two. The 3D parts I had printed by Shapeways came out brilliantly and I now have working doors and drivers flaps. It's not just a show off thing, it gives me somewhere to hide switches out of sight.

Helen x


Attachments
__________________


Colonel

Status: Offline
Posts: 210
Date:
Permalink   

Helen,

that is beautiful!

Thank you for sharing it with us!

Thorsten

__________________
m83


Sergeant

Status: Offline
Posts: 38
Date:
Permalink   

Helen,

Wow, it is indeed a beautiful model, once again my congratulations on a superb build !!
I have been following this thread for a while and now you are at this stage I guess in the not too distant future there is a big decision for you to make ; are you going to paint it?

As it stands the finish is superb, clean lines and nice shiny exterior - its almost a shame to cover it, but if you want an accurate model it surely has to be done.......or does it? There is so much discussion about accurate paint shades, how are you going to approach this issue?

Moving on a little, the finish is only half the question, as it is also the decision of 'factory fresh' or 'used and been there' ? We are used to seeing photos of surviving tanks in pristine paintwork, but this is not really how they would have been after a little while in mud, grime, oil and grease. Model makers approach to authentic paintwork varies so much and to varying degrees, but the finish is perhaps everything.

I am sure whatever you decide to do it will be well thought out and well executed as with everything you have done so far.

look forward to seeing more photos when time allows

thank you, kind regards Kev


__________________


Hero

Status: Offline
Posts: 808
Date:
Permalink   

Hi Guys, and Thanks xxx

My intention is to get the model up and running in bare metal for this year, then to paint it over the winter.

To be honest I'm a tortured soul as far as what colour to go for. Probably going to prime the model in grey in the hope it will help me decide. The thing is, I like the grey with Russian Cyrillic's as it tells a story. Then again, I also like the camouflage. One thing for certain is it will most definitely be weathered!

One thing I have noticed when it comes to a really good paint job, is it must have all the oil and rust bits in the right places. I love using paint to give wood and plastic the look of different materials and age.

Last year I built a display model of a Canal Boat for someone. It was all in begged and borrowed bits of wood, with a few 3D printed fitting thrown in. The part I enjoyed most was changing it all to brick and dirt, rough work boat, fancy family cabin, all with paint. I know it's not a tank, more a dolls house in a boat shape, but I will bring the same love to my model MK1 Tank.

Helen x


Attachments
__________________
m83


Sergeant

Status: Offline
Posts: 38
Date:
Permalink   

Helen, you are very talented, loving the model of the Canal Boat, great attention to detail.

You are going to have fun painting the tank for sure..............whatever colour scheme you decide on!!!

Kev


__________________


Hero

Status: Offline
Posts: 808
Date:
Permalink   

It's finally happened... The Tank Runs! YES!!!!!!:)

So happy to have reached this major point in the build, couldn't have done it without the help from all you guys on here xx

What can I say, it rattled and the chain fell off, but it managed five runs before giving up. Looked great. :)

Tanks First Run

Remember to up the video settings.

Helen x


__________________
m83


Sergeant

Status: Offline
Posts: 38
Date:
Permalink   

Congratulations Helen, fabulous video well done!!!

Kev

__________________


Legend

Status: Offline
Posts: 1626
Date:
Permalink   

Well done Helen great stuffwink


__________________

"Ash nazg durbatulûk, ash nazggimbatul, ash nazg thrakatulûk, agh burzum-ishi krimpatul"


Hero

Status: Offline
Posts: 870
Date:
Permalink   

Fantastic Helen, would like to see it going through some mud though ?
Paul

__________________

 The finest stories of the Great War are those that will never be told.


Major

Status: Offline
Posts: 142
Date:
Permalink   

Stunning build Helen, and love the video.

That' modellingaww


Luca.


__________________


Hero

Status: Offline
Posts: 808
Date:
Permalink   

Thanks Guys x

I was hoping to sneak my little model into Tankfest this year, but it looks like it is now not going to happen. no

On the up side I will be there anyway on the Sunday to hunt out and annoy anyone unable to quickly hide when they see me. smile

Helen x


Attachments
__________________


Hero

Status: Offline
Posts: 808
Date:
Permalink   

Sunday I got to take the MK1 for only its second run at the Southern Model Show in Kent. Other than a few hiccups with flat batteries no I had a good time giving the model a proper run. Tracks starting to rust up nicely. 

The challenge now is to get the Tail Wheel Assembly ready for the Model show at Bovington next month.

Helen x


Attachments
__________________
«First  <  1 2 3 4 5  >  Last»  | Page of 5  sorted by
 
Quick Reply

Please log in to post quick replies.

Tweet this page Post to Digg Post to Del.icio.us


Create your own FREE Forum
Report Abuse
Powered by ActiveBoard