Based on the few scant photos available - the best being the face on shot of trackless Mk.I tanks under repair - I am trying to get my head around the arrangement / fixing of spare track plates on the front of tanks *and* identify what the nondescript lumpy things are behind them.
Can anyone shed any light on this aspect of Gaza tanks?
Also, at what point were Mk.Is 'up-armoured' this way? 1st battle, 2nd..? Or, in other words, is it a *must* to model this detail on Gaza Mk.Is or could I correctly model HMLS 'Tiger' without such add-ons..?
Thank you in advance for your thoughts & assistance.
__________________
"You there on the port!". "S'gin actually, but thanks for noticing [hic]".
Greetings compound eye, and also greetings to all the other great members of this wonderful forum!
I'm a new member here, and a model builder from Germany. I am currently building H.M.L.S. Tiger from the Takom Mk.I Female kit, with a correct Mk.I cab and Vickers MGs from MR Modellbau. And she will be decorated with the "Gaza" decals from Denis.
I have been following the discussions here for quite a long time now, and I have found that this forum has proven to be my number one research base for my Tiger project. (And for all the other kits in my huge of to build stash)
I would like to take this opportunity to thank you all very, very much for sharing your huge wealth of knowledge so freely.
To your questions compound eye;
Sandbags! The lumpy things are sandbags like you already suspected. There is a picture of Tiger, all packed up with stuff and with part of her crew sitting on top, that show this quite clearly. I think Wingate posted the picture in a post about his grandfather who was the driver of Lady Wingate at Gaza.
I believe that the tanks were uparmoured in this way between the 2nd and 3rd battle of Gaza.
But not only the Mk.I tanks were modified in this way.
I also found pics of Sir Reginald, which was a Mk. IV male, that also had this type of armour and sandshields fitted. Lady Wingate also had armour.
I think that the tank without tracks that you mention, is in fact a Mk.IV and not a Mk.I. If it is the same picture, as the one that I have saved, then it is clearly a Mk.IV. It has a ball mount for a Lewis MG and not the flat hatch/flap for a Hotchkiss as was mounted on the Mk.I tanks.
Another thing I would like to point out, is that the head lights were moved from the standard position between the horns, to a position next to the visors on the cab.
This was most likely done to make space for the armour.
In Wingate's post there is also a pic of a Mk.I from head on showing it's bottom. Wingate states that the original photo is titled "Tiger". Note that, in that picture Tiger still has it's head lights in the standard Mk.I position, and no armour.
So yes. In my opinion you can model Tiger correctly without any add on armour. H.M.L.S Tiger was one of the original eight Mk.I tanks that was sent to Egypt.
On the internet I found a video on . http://www.bridgemanimages.com. FOOTAGE number AUS1128756
The tanks in the video are clearly recognizable as H.M.L.S. Sir Archibald, H.M.L.S. Otazel and H.M.L.S. Nutty.
Since both Sir Archibald and Nutty, along with War Baby were lost at the 2nd battle of Gaza, the footage must predate that event.
Again no signs of any add on armour.
I hope this helps
Ralf
P.S. My H.M.L.S. Tiger has already has already been uparmoured, and is almost ready for paint. I will try to upload some pictures over the weekend.
Please *DO* post pictures of your HMLS Tiger as soon as you can.
I found mention of track plates being nailed to palm tree logs using the holes where the track shoes were riveted, in another post. That is one scenario.
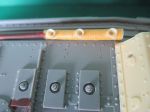
I have also seen three pairs of whole track links jammed loosely into a mound of sandbags on the glacis plate, but what the mound in front of them is [more sandbags?!] and how it is secured to the bow of the tank [looks like some form of strapping] are unclear.
Presumably someone in Gaza had 'an idea' or a nasty experience and wanted to avoid rifle / machine gun fire glancing off the glacis plate and splashing through the hatches & vision slots on the cab, by baffling / deflecting such incoming fire with spare track / logs / sandbags... I am guessing that it was one man's stroke of genius and that with only 8 tanks to 'upgrade' it is often seen in Gaza photos. Whether it was worthwhile or not, who knows? Why it wasn't adopted on other fronts, who knows? Not sure the MkIV had any better protection...
__________________
"You there on the port!". "S'gin actually, but thanks for noticing [hic]".
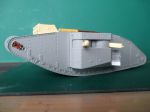
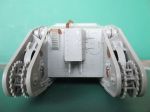
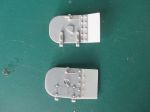
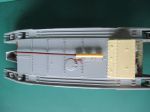
Here some more pics of Tiger with the modifications that I have done so far.
Still missing: The headlights, the tail light, the U-clamps for the exhaust, straps for the extra armour and the burst plate studs. Oh, and of course the tracks
Really enjoying your model of HMLS Tiger. Especially the Up-Armour of Palm Tree trunk, Track Plates and Sandbags. looking forward to seeing how it turns out.
Silly question, but why was there a need to up armour the tanks? I assume the Turkish troops in Gaza didn't have any anti-tank rifles or guns...or did they??
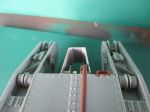
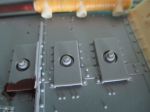
I first drilled the bottoms of the 3 MR pipes out to the same diameter as the inner diameter Takom exhaust pipes. Then I glued pins made from streched sprue into the tops of the Takom pipes, to fit into the holes in the MR muffler.
But then I saw that the exhaust sits too high, so I simply drilled out the holes in the MR part to the same diameter as the outer diameter of the Takom pipes...I know this sounds very complicated, so I will make some pics tomorrow and post them. It is too dark for photos now.
My MR muffler was too long and did not match the 3 outlets of the tank...So I simply cut the muffler into three parts, set them on the model and glued the whole lot togeter again with super glue. Once the glue had dried I used super glue and baking to fill the gaps which I then sanded smooth. The saw blade was wide enough to do the trick.
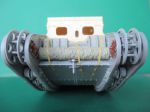
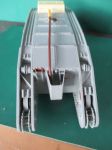
Here a pic from the top of Tiger, but I will make a better one tomorrow.
Another tip; the exhaust pipe itself, is a length of 2,5mm styrene tube. I stuck some copper wire into it so that it kept its shape when I bent it.
However when I tried to bend the more acute bend at the rear, it broke! So I made this by cutting some angled segments of the tube, which I then pushed over the wire and glued on to the end of the pipe until I had the desired radius...finally I used the trick with the SG and baking powder again to fill the gaps.