Landships II

Members Login
Username 
 
Password 
    Remember Me  
Post Info TOPIC: Mark I Male (MasterBox, 1/72)


Colonel

Status: Offline
Posts: 210
Date:
Mark I Male (MasterBox, 1/72)
Permalink   


Hi all,


some weeks ago I got a MasterBox Mark I Male for a good price and decided to build it immediately. The building process was fast but I did some modifications, mostly based on Helen's plans and renders here on the board.


First I opened the mud holes between the rear horns and improvised the wheel and inner plates with some styrene sheet:


The rear bar holding the large wheels was rebuilt using some 0.25mm styrene with 0.6mm holes:


This is the kit part of the lifting mechanism:


I rebuilt it from styrene sheet and stretched sprue, too, after adding the radiator filler:


The gun shields got the openings for the telescope:


This is the final appearance before the tracks were added:


I was unhappy with the rubber tracks, and not wanting to spend a lot of money for replacements, I pressed the rubber into plasticine and cast them from a thin layer of resin:


Before glueing them to the track frames, a strip of styrene was glued into the groove, adding some space between the tracks and the frames, especially around the idler wheel:


The resin tracks were used in sections and individual track links cut from the strips. I'm aware of the fact that they needed to be longer and overlapping, but it was a compromise. After adding some mud it should be ok I guess:


I plan to build a little diorama to go with it, and painting might take some more time.


Best regards,

Thorsten


__________________


Lieutenant-Colonel

Status: Offline
Posts: 150
Date:
Permalink   

Really a nice work expecially your new homemade tracks!

__________________


Hero

Status: Offline
Posts: 870
Date:
Permalink   

Fantastic work on improving this kit. May I ask, what size did you drill the barrel ?

__________________

 The finest stories of the Great War are those that will never be told.


Colonel

Status: Offline
Posts: 210
Date:
Permalink   

Thanks! Paul, I think it was a 0.6mm or 0.7mm drill, I just took what fitted to the diameter of the plastic part, not looking for accuracy in this case.

__________________


Hero

Status: Offline
Posts: 808
Date:
Permalink   

Hi Thorst,

Love the fact you made your own track, also how you've spaced it away from the hull a bit. 

Keep the photos coming. I may not be on here as much as I once was but still love seeing different peoples interpretations of the MK1 Tank Kits.

Helen x


__________________


Colonel

Status: Offline
Posts: 210
Date:
Permalink   

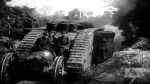
Thanks Helen! I hope to make progress in the Christmas holidays. I'd like to build the scene seen in the picture below as a diorama, but I'm not looking forward to convert little EMHAR soldiers to the poses needed.


(source: Landships II)

Thorsten


__________________


Lieutenant-Colonel

Status: Offline
Posts: 169
Date:
Permalink   

Fantastic work, congratulations!


__________________
If ye break faith with us who die We shall not sleep, though poppies grow In Flanders fields.


Lieutenant-Colonel

Status: Offline
Posts: 156
Date:
Permalink   

Nice work!


__________________


Field Marshal

Status: Offline
Posts: 446
Date:
Permalink   

Looks great so far, well done.

__________________

Has anyone else noticed "new and improved" seems to mean it doesn't work as well as it used to?


Lieutenant-Colonel

Status: Offline
Posts: 176
Date:
Permalink   

Nice work. You and all other builder of this kit might want to check the book "The Tanks at Flers" on their first actions. Some did not have the wire neting on top and at least 2 had stowage boxes on the X frames of their steering wheel tails.

__________________


Major

Status: Offline
Posts: 145
Date:
Permalink   

Very nice work - looking forward to future updates.

__________________


General

Status: Offline
Posts: 344
Date:
Permalink   

Thorst, I have just refreshed my article on improving and correcting the shortfalls with the MasterBox Mk1 steering tail. I realise you have completed yours but thought you might like to see what else can be done to get it right - for the next one you build.

Happy New Year.

__________________

Regards TeeELL

Growing old is compulsory, growing up is optional.


Colonel

Status: Offline
Posts: 210
Date:
Permalink   

I have not started painting it yet, so yes, any corrections are very welcome!


__________________


General

Status: Offline
Posts: 344
Date:
Permalink   

I've bumped the thread as you can see, hope it helps. I've a thread on the grenade canopy as well, search TeeELL. I don't want to bump that thread as well until I add new information to it.

__________________

Regards TeeELL

Growing old is compulsory, growing up is optional.


Captain

Status: Offline
Posts: 78
Date:
Permalink   

Hey, now in this moment I`m building the same kit...

For more details I want to use NH Details etch parts, MR Models upgrade set and JS Resins tracks including grouser spuds (the spuds can be used on Mk IV later)...

I also will create a diorama by using W^D-figures (British tankers and maybe some infanterie)...


__________________


Captain

Status: Offline
Posts: 78
Date:
Permalink   

For creating MKI I organzid this set, but is it realistic to use this baggage on the top and backside??? Until yet my plan is to use this top net...

3865663331346463.jpg 


__________________


Brigadier

Status: Offline
Posts: 299
Date:
Permalink   

Hello Stefan,

as you can see in this bit of film (source: YouTube), there were Mark I's with all that stuff on the deck and on the back.

I think you would not want that stuff around when driving into battle......

Here is a still from the film:

MK I stowage.jpg

Best regards,

Willem


-- Edited by Willem Visser on Sunday 8th of January 2017 04:06:21 PM

Attachments
__________________


Private

Status: Offline
Posts: 4
Date:
Permalink   

Just for interest where did the mesh for the grenade protection come from

__________________
R W Kirby


Field Marshal

Status: Offline
Posts: 433
Date:
Permalink   

That's a good question! Given that the first set of twenty grenade roofs were built and sent to France over a period of three days, I would have to imagine that the mesh was simply a readily available fencing material. Note that the segments of mesh were not trimmed to fit the roof, and overlapped the edges.


__________________


Field Marshal

Status: Offline
Posts: 421
Date:
Permalink   

Nice detailling work!

__________________
Page 1 of 1  sorted by
 
Quick Reply

Please log in to post quick replies.

Tweet this page Post to Digg Post to Del.icio.us


Create your own FREE Forum
Report Abuse
Powered by ActiveBoard